Related Posts Plugin for WordPress, Blogger...

Friday, August 30, 2013

Fun 3 Fold Gift Card Holder


Happy Friday Stampers!! Welcome to Mrs. Lincolns Inkin' and today's Friday Video!!!!

Today's project share is of yes, another gift card holder:) I told you that lately i have been obsessed with making them!! With the holiday's right around the corner you can never start too early on making your gift card holders.  Cause lets face it... we all give out at least one or two over the course of the holiday season!  Here is the inside view of the card:


Well let's not wait any longer.  Roll film!!!!!!!


LOVE IT! Now like i mentioned in the video this does not have to be made into a gift card holder if you don't want it to be.  You can always skip the step with the Word Window Punch and just put a plain of card stock there as shown in the card below:


Here are the dimensions again in case you missed it in the video. You will need a piece of plain card stock cut at 11" x 4 1/4" and scored at 4 1/4" and 8 1/2".  The piece of DSP that you will need for the front is cut at 4" x 4".  If you decide that you want your project not to be a gift card holder, than the piece of Whisper White (or whatever color you want) is also cut at 4" x 4".  If you do make yours into a gift card holder, than the piece of Whisper White needs to be cut at 4" x 2 1/4".  I just noticed that in any of my project where i made the gift card holder i didn't put a piece of Whisper White for my greeting:( What was i thinking!! Anywhoo, that piece would go right above the Word Window Punch.

The stamp set and coordinating punch that i used in the video today that i am showcasing is the Pennant Parade and the Petite Pennants Builder Punch.  Here are a look at those two amazing products:


Well all, that is it for today's share.  I really hope that you enjoyed.  Until next time all...
Happy Inkin'
Sara
Pin It

See something that you like?  Place your on-line order with me 24/7

SUPPLY LIST: (Only for video project)

STAMPS:
* Happy Hour - 126642
* Pennant Parade - 122742

INKS:
* Baked Brown Sugar - 131174
* StazOn - 101406
* Real Red - 126949
* Gumball Green - 126861

CARD STOCK:
* Cherry Cobbler - 119685
* Gumball Green - 126840
* Whisper White - 100730
* Season of Style DSP - 132181

TOOLS:
* Paper Trimmer - 126889
* 2 1/2" Circle Punch - 120906
* 2 3/8" Scallop Circle Punch - 118874
* 1 3/4" Circle Punch - 119850
* Word Window Punch - 119857
* Petite Pennant Builder Punch - 122361
* Dimensionals - 104430
* Snail - 104332


Thursday, August 29, 2013

Holiday Mini Blog Hop!!!!


Hello Stampers!!!! Welcome to Mrs. Lincolns Inkin'!!  Today's post is a very special post, Mrs. Lincolns Inkin' is involved in her very first Blog Hop!! I am so excited!!!  If you are participating in the blog hop today then you should of just came from Lisa's site at Pretty Pastimes! Aren't her creations great???!!!

For my share's today i am highlighting on Halloween.  I love Halloween and getting my little one all dressed up as something cute! I love the pumpkins, the cider, the smell.. the colors.. i just love everything about "Fall" in general.  Including Halloween.

All of my projects today are showcasing items that are available right now in the Holiday Mini.  You can view that total catalog Here.

For my first card i used the Halloween Happiness stamp set in the Tangerine Tango.  I backed my image with a piece of Old Olive card stock which is cut 5/8" of an inch smaller all the way around from the base of my card which is average size of 5 1/2" x 11" scored at 5 1/2".  But wait... there is more to this card than meets the eye!!!

When you open up the card........


It's actually a File In The Middle Card! Oh i love it!!!!!


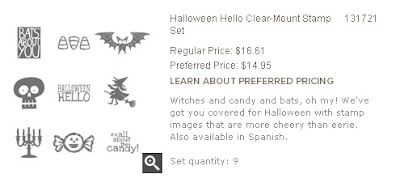
See how you can see the image through the scallop circle?  These cards are so fun to make!! For my images inside i used the Halloween Hello stamp set! So CUTE!!!!!  Here is a closer look at that set:


For the second project that i created for the "Hop" I chose to get a little more "Punchy", lol:)


I created a picket fence with my Word Window Punch (LOVE IT!!) and my pumpkins with my 1 1/4" Circle Punch and Large Oval Punch and my moon with the 1 3/8" Circle Punch. I love using punches to make different things.  Again, i used the Halloween Hello stamp set. That set is just so stinking cute!!! 


I stamped my bats from the set onto a piece of Whisper White using Smokey Slate.


I used Pumpkin Pie for my pumpkins (of course, lol) and ran them through my Big Shot using the Perfect Polka Dot embossing folder.  I then sponged the edges with my Pumpkin Pie ink and gave them a little stem with some Soft Suede card stock.

Well that's all for my post today folks.  If you are continuing on the Hop... hop right along to Simply Sara Stampin'. Aren't her creations great!!!! Until next time...
Happy Inkin'
Sara
Pin It
See a product that you like?  Shop my on-line store 24/7

SUPPLY LIST


PROJECT #1                                                                

STAMPS:                                                                 
* Halloween Happiness - 131859                                
* Halloween Hello - 131721

INKS:                                                                       
* Tangerine Tango - 126946                                
* StazOn - 101406                                                    

CARD STOCK:                                                     
* Pumpkin Pie - 105117                                            
* Basic Black - 121045                                            
* Old Olive - 100702                                                
* Whisper White - 100730                                      

TOOLS:                                                                 
* Chevron Embossing Folder - 127749                
* Deco Framelits - 130102                                        
* Big Shot - 113439                                                  
* Red Sticky - 104294                                              
* Snail - 104332                                                        
* Dimensionals - 104430                                        
* 1 1/4" Circle Punch - 119861                              
* 1 3/4" Scallop Circle Punch - 119854                
* 1 3/8" Circle Punch - 119860                              
                                                                                   
PROJECT #2

STAMPS:
 * Halloween Hello - 131721

 INKS:
 * Smokey Slate - 131179
* Pumpkin Pie - 126945

CARD STOCK:
* Basic Black - 121045
* Pumpkin Pie - 105117
* Soft Suede - 115318
* Whisper White - 100730

 TOOLS:
* Word Window Punch - 119857
* 1 3/8" Circle Punch - 119860
* 1 3/4" Circle Punch - 119850
* Large Oval Punch - 119855
* Sponges - 101610
* Perfect Polka Dot Folder - 119335
* Big Shot - 113439
* Dimensionals - 104430
* Snail - 104332
* Paper Snips - 103579

Monday, August 26, 2013

Purse Gift Card Holder


Hello stampers! Welcome to Mrs. Lincolns Inkin'!!  Today's post I wanted to share with you this adorable little purse.  When you open it up....


Ta-da!!! It's a gift card holder.  I am really into gift card holders right now.  Maybe it's because i am ready for the holiday season already:)  Today's post i am going to take you through step by step on how you can make this project.  Let's get started.

First the two pieces of paper that you are going to need is a piece of DSP cut at 6" x 6" and a a Top Note cut our from your Big Shot.  For my actual project i used the Eastern Elegance DSP put for my photo tutorial i grabbed a piece of Polka Dot Parade (126902).  My Top Note in my actual project is Soft Suede and the one for the tutorial is So Saffron (105118).


Once you have those cut, you need to do some scoring.  On your 6" x 6" DSP you need to score it right down the middle at 3"

 Score at 3"

Then you will need to score your Top Note at 1 5/8" and then 2 1/8".  Now, on the new SU! Trimmer, i have found that when trying to score your Top Note place the rounded edges on the 1 1/2"  mark when scoring your 1 5/8" mark and then your rounded edges on the 2" mark when scoring the 2 1/8" mark.  See below... how my rounded edge is resting on the 1 1/2" mark?  That enables me to score in the right spot for my 1 5/8" mark since the new trimmers don't have lines all the way down so you can line up your points.  I really hope that makes sense, lol:)


Once that is scored you 6" x 6" piece and Top Note should look like this:


Once that is done, take your Top Note and punch 2 holes on the ends.  Even though the product is retired from SU!, i find that my Crop-a-Dile works the best, and that is what i used.  I used the smallest size (1/8" side) and punched my holes.


Now you would take and place/tie your ribbon into place for your handle.


Now, with your 6" x 6" piece (scored down the middle at 3"), with the "opening facing you" you need to cut it at 5/8".  Place it in your cutter as shown below:


You want to make sure that the "closed" corner is the one that is in the "cutter slot" and that the opening is facing the bottom.  That is the point that you line up at 5/8".

Flip it over and do the same thing to the other side:


Once you have that done, now take the top of your cut DSP and place it directly under the score line of your Top Note:


For my gift card holder pouch (you can't really tell seems how it is see through, lol) but i used a SU! 8 1/2" 8 1/2" page protector and cut it at 2 1/2" x 4 1/4", then applied Red Sticky on the 3 sides (leaving the top side open so the gift card can fit in there).


And that is how you make the Gift Card Holder Purse.  Now you would finish it off by decorating the outside and finding what you wanted to used to hold it closed.  I used 3 layers for mine.  The bottom layer is the 1 3/4" Scallop Circle Punch (Pool Party) then the 1 1/2" Circle Punch (Soft Suede) and then the greeting is punch out perfectly using the 1 3/8" Circle Punch (Very Vanilla)


Well, i know it was a different kind of post today but i sure hope you enjoyed it and i didn't confuse you too bad LOL:)  If you have any questions, or did get confused by my directions please do not hesitate to contact me and i will try my best to walk you through it again:)  Until next time all...
Happy Inkin'
Sara
Pin It
See A Product That You Like?  Order From My On-Line Store 24/7!!!!

SUPPLY LIST:

STAMPS:
* Chalk Talk - 130634

INKS:
* Soft Suede - 126978

CARD STOCK:
* Eastern Elegance - 130131
* Soft Suede - 115318
* Very Vanilla - 101650
* Pool Party - 122924

TOOLS:
* Top Note Die - 113463
* Big Shot - 113439
* 1 3/4" Scallop Circle Punch - 119854
* 1 1/2" Circle Punch - (non SU!)
* 1 3/8" Circle Punch - 119860
* Crop-o-Dile (retired)
* Victoria Lace Ribbon - 118481
* Red Sticky Strip - 104294
* Page Protector - 112455
* Velcro (local store)
* Snail - 104332
* Dimensionals - 104430
* Paper Trimmer - 126889
* Bone Folder - 102300


Friday, August 23, 2013

Happy Birthday Gift Card Holder


Happy Friday all!!!! What a great day huh?  I love Friday's!  Welcome to this weeks Friday Video here at Mrs. Lincolns Inkin'!!

Today's video is showing you how to make the cute gift card holder that i posted to my blog earlier this past Monday.  You can check that entire post out HERE.  This past week i have been showcasing the 2 awesome stamp sets Perfect Blend and Sassy Salutations.  I have loved getting creative with all the images in the sets.  However, for the video today i will be using another new set that i just received, Blue Ribbon! I got it as a gift from my up-line for the work that i have been doing on my website! I was so greatfull and shocked that it was being reconiged and want to thank everyone that visits and makes me love posting everyday.

Well, enough with the sappy stuff right, lol?  Let's get on with today's video:


After the video i did change a few things:


I didn't like how the Blushing Bride Elegant Butterfly was looking so i changed him to Melon Mambo and also added him a friend down on my White Organza Ribbon.  Put some bling on them with my Jewels and they were good to go:)  The measurements again for the project today are super easy, just a few cuts and scores.  The base of your card needs to be 9" x 4" scored at 1" and 4".  That's it.  It really doesn't get any easier than that right?


I also left the inside of my project bare (which i hardly ever do and must say it's driving me crazy) but i don't know yet what i want to put inside or where i want my "message" to go.  So, while i think about it...here bare it sits:)

I mentioned earlier that the set that i used today was the Blue Ribbon set.  That is the set that i am showcasing today.  Here is a closer look at the entire set:


Well friends, that's all for today.  I hope you enjoyed and until next time...
Happy Inkin'
Sara
Pin It

See a product that you like?  Order from my online store 24/7.  

SUPPLY LIST:

STAMPS:
* Blue Ribbon - 125981

INKS:
* Melon Mambo - 126948
* StazOn - 101406

CARD STOCK:
* Blushing Bride - 131198
* Basic Black - 121045
* Whisper White - 100730
* Melon Mambo - 115320

TOOLS:
* Paper Trimmer - 126889
* Paper Snips - 103579
* Red Sticky Strip - 104294
* Snail - 104332
* Glue Dots - 103683
* Dimensionals - 104430
* Jewels - 119426
* White Organza Ribbon - 114319
* Deco Framelit Labels - 130102
* Big Shot - 113439
* Elegant Butterfly Punch - 127526
* 2 3/8" Scallop Circle Punch - 118874
* 1 3/8" Circle Punch - 119860

Thursday, August 22, 2013

Merry Christmas with Perfect Blend


Hello friends! Thanks for visiting!

Today is the last day of my Perfect Blend and Sassy Salutations series. I have had soooo much fun creating with these sets the last few days. Today's card is a Christmas card.  You can never get to early of a jump on some Christmas cards right?  I used the cup (of course) as my vocal point which is from the Perfect Blend stamp set.  Here is a closer look at the entire set:


To add a little Christmas cheer to my cup i this time decided to give it a straw and a little bit of Holley around the straw.  Can't burn your lips on that hot coco during the chilly holiday season!


My card today measures an average size of 4 1/4" x 11" scored at 5 1/2".  I used a piece of DSP from the Season of Style DSP pack that is available right now in the Holiday Mini.  Click Here to take a look at the entire catalog and all the awesome products that are available.  That piece is cut at 4" x 5 1/4", just enough to allow my Cherry Cobbler base piece to show through around the edges.  I then used my Deco Labels and piece of Gumball Green card stock to accent my cup.  I just love the Green and Red together.  Classic Christmas colors!!!

The sentiment is from the awesome stamp set Sassy Salutations, the second set that i have been showcasing the last few days.  It's an awesome set that has a greeting for almost everything.  Plus the way the letters look is just super cute!!! Here is a closer look:


Well all, that's it for today's share.  I hope you had a nice time visiting and i hope you visit again soon.  Until next time...
Happy Inkin'
Sara
Pin It

SUPPLY LIST:

STAMPS:
* Perfect Blend - 131392
* Sassy Salutations - 132070

INKS:
* StazOn - 101406

CARD STOCK:
* Gumball Green - 126840
* Cherry Cobbler - 119685
* Season of Style DSP - 132181
* Crumb Cake - 120953
* Very Vanilla - 101650
* Whisper White - 100730

TOOLS:
* Gumball Green Ribbon - 126848
* Deco Label Framlits - 130102
* Big Shot - 113439
* Dimensionals - 104430
* Jewels - 119246
* Snail - 104332
* Paper Trimmer - 126889


Wednesday, August 21, 2013

Thinking of You with Perfect Blend


Hello all.  Welcome to Mrs. Lincolns Inkin.  This week i am featuring the stamp sets Perfect Blend and Sassy Salutations.  All week i have posted creations that i have made using those two sets only! I have had a ton of fun getting crafty with these two sets.

The card that i made today is a a Thinking of You card.  The amazing greeting came from...you guessed it... the Sassy Salutations set. I can't explain how much i love this greeting set.  Here is a closer look at it:


It's got almost every kind of greeting that you would need:) LOVE IT!!!!


 For the vocal point of my card i used the cups again from the Perfect Blend set.  I decided to make them Green this time using my Gumball Green card stock.  What are my favorite colors together?  Yup, you got it... it's Green and Pink.   Any shades of those two colors together and i love it.  So that was part of the inspiration for my card today.  I used Very Vanilla for the hand protector (that's what i always call it) and the lid and stamped one of the greeting from the Perfect Blend set on the protector.  Here is a closer look at the Perfect Blend set:


My card today measures average size of 4 1/4" x 11" and then scored at 5 1/2".  My Blushing Bride piece that i used for my backing is cut at 3 3/4" x 5". I ran that through my Big Shot using the Perfect Polka Dots embossing folder.  See some products that inspired you today and you just can't wait to get crafty with them?  Well visit my on-line store HERE and place your order today! I appreciate your business!!!

Well all, that's the share for today.  I truly hope you enjoyed and until next time...
Happy Inkin'
Sara
Pin It

SUPPLY LIST

STAMPS:
* Perfect Blend - 131392
* Sassy Salutations - 132070

INKS:
* StazOn - 101406

CARD STOCK:
* Strawberry Slush - 131295
* Blushing Bride - 131198
* Gumball Green - 126840
* Basic Black - 121045
* Whisper White - 100730
* Very Vanilla - 101650

TOOLS:
* Perfect Polka Dot Embossing Folder - 117335
* Big Shot - 113439
* Paper Snips - 103579
* Dimensionals - 104430
* Jewels - 119246
* Snail - 104332
* Paper Trimmer - 126889
* Decorative Label Punch - 120907

Tuesday, August 20, 2013

Masculine Birthday with Perfect Blend


Good day stampers. Welcome to Mrs. Lincolns Inkin'!!!

Today is day 2 of the weekly share of the Perfect Blend stamp set as well as the Sassy Salutations set.   These are 2 sets that i recently received and i haven't been able to put them down.  I just love the cup in the Perfect Blend set and there is a great saying for almost everything you need in the Sassy Salutations set.

Today's card is a masculine card using both sets.  I wanted the colors to be bold yet subtle is that even makes any sense, lol:)  I chose Wild Wasabi, Basic Black and the DSP Gingham Garden.


My card is an average size card of 4 1/4" x 11" scored at 5 1/2".  My strip down the side measures 2" x 3 1/4" (Wild Wasabi) and 1 3/4" x 3" (Gingham Garden).  I wanted to add a bit more depth to my card today so i used my Sponge Daubers and went around the cup, lid and the DSP that is used for the "hand protector" with Sahara Sand.

Here is a closer look at these 2 amazing stamp sets:


Aren't they adorable.  Don't think that you can craft another minute without them?  Then click HERE and place your order with me today! I really appreciate your business!!

That's all for today's share #2 of the Perfect Blend and Sassy Salutations series.  Until next time all....
Happy Inkin'
Sara
Pin It

SUPPLY LIST:

STAMPS:
* Perfect Blend - 131392
* Sassy Salutations - 132070

INKS:
* StazOn - 101406
* Sahara Sand - 126976

CARD STOCK:
* Wild Wasabi - 108641
* Basic Black - 121045
* Crumb Cake - 120953
* Very Vanilla - 101650
* Whisper White - 100730
* Gingham Garden - 129310

TOOLS:
* Paper Snips - 103579
* Sponge Daubers - 102892
* Dimensionals - 104430
* Paper Trimmer - 126889
* Snail - 104332