Related Posts Plugin for WordPress, Blogger...

Friday, March 29, 2013

Metallic Background Video


Happy Friday everyone! Another week bites the dust!!  This weekend though is very exciting... it's Easter!  Does everyone have big plans?  Our family does a mini Easter egg hunt for our little one in the morning followed by her basket and little gifts that the Easter Bunny leaves her and then we have a family dinner.  This year we are headed to my in-laws:)  It's going to be a great time!!

For today's card i wanted to show how i did the Metallic Background technique that i introduced earlier this week in this post here.

Isn't that a great technique?  I love how it is subtle but still adds sooo much!!  After my background dried i finished my project by still swarming around the Easter theme.  I used my All Dressed Up stamp set with the coordinating die set, Dress Up Framelits.  To pull in the Primrose Petals ink that i used for one of my background colors i used a strip of the matching card stock cut at 1 1/2" x 5 1/2" and edged it with my Scallop Trim Boarder Punch.  I tied my card together with the Easter Blessing stamp on a piece of Wild Wasabi card stock (the other color i used on my background).


The item that i wanted to highlight again today is the Shimmer Paint.  This item is so great and i am really going to try to use it more.
Well all, i hope you enjoyed another Friday Video Tutorial and until next time...
Signature Fonts
Image by FontMeme

Supply List:

Stamps:
*All Dressed Up
*Easter Blessings

Ink:
*Wild Wasabi
*Primrose Petals
*Basic Black
*Daffodil Delight

Card Stock:
*Whisper White
*Soft Suede
*Wild Wasabi
*Primrose Petals

Tools:
*Big Shot
*All Dressed Up Framelits
*Vine Street Embossing Folder
*Sponge Daubers
*Frost White Shimmer Paint
*Scallop Trim Boarder Punch
*Sponges
*Jewels
*Snail
*Dimensionals
*Paper Trimmer

Thursday, March 28, 2013

For Sale


Hello all.  Well today's post is a bit different.  i am not posting a card today but rather a flyer showcasing my hubby's truck that is for sale:(  I am sad to see it go, it has been such an awesome truck but it is time to move on!

Now, i know that this post might only apply to those that check my blog that are in the area where we live, unless you feel up to taking a drive to the Mitten State that is:)  But, nonetheless, i didn't think it would hurt to post it!

This is a 2006 Chevy Silverado z71 Crew Cab that is in excellent condition.  My hubby is a professional detailer so you know the truck is going to look like new!!!  There have been lots of little extras that have been done to it like Flow Master Exhaust, tinted windows, touch screen stereo system with amplifier and sub along with many more!

If anyone is interested, or happen to know of someone that might be, please contact my hubby Nick (his info is on the flyer).  Thanks so much for looking and until next time...
Signature Fonts
Image by FontMeme

Wednesday, March 27, 2013

Sending Love


Hello there, welcome!!!

Today's card is a card where i used a new Lawn Fawn set (well, it's new to me, lol) called You've Got Mail! I have been waiting to get this set for what seems like forever!!!  I love the Lawn Fawn stamps.  They are totally clear which makes it easy to see where you are placing them! Right now SU! has a promotion going on for a new set of Photopolyer Stamps, click here to see the flyer.  I really hope that they continue to come out with them!!!

I started my card off with a normal size, 4 1/4" x 5 1/2", piece of Very Vanilla for my base.  I then used a piece of DSP from the Lost & Found series called Madison Avenue.  I wanted the paper to look old and worn so i used my paper snips to cut slits into it and then rubbed on some Distress Ink- Old Paper around the whole thing.


I then took a piece of Basic Black cut at 4 1/2" x 3 1/4" and placed it in the center of my "slits" that i made.  I decorated my post card the way that i wanted it on a piece of Whisper White Card Stock and then colored and cut out my mailbox.


For my mailbox i stamped my image in Pacific Point Ink and then colored it with my B21 Copic Marker.  Normally when i am coloring with Copic, i stamp my image in a Memento Ink.  This is the only ink that i have found doesn't run or bleed when the Copic ink touches it.  However this time i did want the ink to run a bit... i think it gives it a nice look so i just used my normal ink!  I cut out about 5 envelopes out of the Very Vanilla and then stuffed them into the mailbox.  Curled up the corners a bit to give it some more dimension! We all know how much i love dimension!

Here is a closer look at the awesome Lawn Fawn- You've Got Mail set:


To see more of their awesome, totally cute products, click here to visit their site!!

Well, i hope you like today's inspiration.  I hope it inspires you to get creative!!! Until next time...
Signature Fonts
Image by FontMeme

Supply List:

Stamps:
*Lawn Fawn- You've Got Mail

Inks:
*Old Paper Distress Ink
*Brown Memento
*Garden Green
*Pacific Point
*Crumb Cake
*Copic B21 and C1

Card Stock:
*Lost & Found- Madison Avenue
*Basic Black
*Whisper White
*Very Vanilla

Tools:
*Paper Snips
*Tim Holtz Foam Applicators
*Razor Blade
*Dimensionals
*Paper Trimmer
*Snail

Tuesday, March 26, 2013

Topiary


Hello there, welcome to Mrs. Lincoln's Inkin'!!

Over this past weekend i hosted a bridal shower for my best friend who is getting married in Vegas in just a few weeks (YAY!!!).  I wanted to share with you the centerpiece topiary that i made for all of her tables.

Since the wedding is in Vegas i obviously wanted to go with some sort of Vegas theme and other than weddings... when you think of Vegas what do you think of?  Casino's!!!  Her colors are White and Black with an accent of Orange so that is what i "rolled" with (i crack myself up!).  Each Topiary is made of a 6 1/2" Styrofoam ball and 3 different color fabrics.  I used small sewing pins (2 in each piece of fabric) to hold my loops into place.  There is really no rhyme or reason as to how i placed my loops, i just did them how i thought they went well together... trying not to clump more than 2 together at a time.


To accent my piece i used flower card holders and put face cards in each, shredded some Basic Black Card Stock and then threw some cards into the shreds for the finishing touch!  The Dice base is a base that i found on a party supply store online that i thought just worked PERFECT!!!  All and all i thought they turned out really nice... especially since this was the first time that i had ever made anything like this!


For the "thank yous" that i made for all of her guests i used a basic box and accented it with one of my paper flowers that i made out of my scallop circle punch and Whisper White Card Stock.  I used my water trick again, which you can watch in my Paper Flowers Video i did here.   

Well, i hope you all enjoyed today's post! I know i sure did enjoy sharing it with you!! Until next time...
Signature Fonts
Image by FontMeme

Monday, March 25, 2013

Metallic Vintage Wallpaper Backgound


Hello everyone, Happy Monday!!! 

Today's card is focusing on the Vintage Wallpaper Embossing Folder with a twist! Notice how the background looks a bit... metallic?  This is an awesome technique that you can do with your Shimmer Paint!!!  Now if you are anything like me, i forget sometimes what all i have in my room.  Things get shoved into drawers or placed on a shelf that i can't see or just gets brushed to the side because it is not one of my "go to" items!  I need to get in the habit of not doing that, lol:)  Well, the Shimmer paint is one of those items for me:(  Sad but true!  So, a little while ago i was working on another project and came across my bottle of Frost White Shimmer Paint and thought to myself that i was going to use this on my next project!  Here is a closer image of the background...


 My card base measures normal size at 4 1/4" x 5 1/2".  After i got done with my background and cut my flower out from the Day of Gratitude stamp set, i added a strip of Soft Suede measuring at 1" x 4 1/4".  This technique is so simple and easy to do, you can use it for any occasion!  Here is a look at the Shimmer Paint that i used:


New from SU!!! 


Your life is: Awesome. Quirky. Exciting. Perfectly messy. And happening really fast. So we're happy to introduce our newest product line that lets you capture it all on-the-go. This and That will debut in the 2013-2014 annual catalog, but we're giving you and everybody else the chance to get it now.

Item
Description
Price
131268
Epic Day This and That Journal
$10.95
130814
Epic Day This and That Designer Series Paper
$10.95
130133
Remember This and That Rotary Stamp
$5.95
131271
Epic Day This and That Designer Stickers
$4.95
131269
Epic Day This and That Designer Washi Tape
$4.95
133350
Epic Day This and That Bundle
Includes the five This and That products listed above. Only available in a bundle until April 30.
$32.08
15% Off Retail Value


Plus, SU! is giving away a FREE trip!!! What?!?!?!? A Free Trip?  Yup, that's right!  Who doesn't need a vacation?!?!? Click here to hop on over to their Facebook fan page to enter and receive all the details!!

Well, i hope you all enjoyed.  Until next time my friends...
Signature Fonts
Image by FontMeme

Supply List:

Stamps:
*Day of Gratitude

Inks:
*Soft Suede
*Lucky Limeade

Card Stock:
*Soft Suede
*Very Vanilla

Tools:
*Vintage Wallpaper Embossing Folder
*Big Shot
*Sponges
*Frost White Shimmer Paint
*Sponge Daubers
*Paper Snips
*Paper Trimmer
*Dimensionals
*Pearls

Friday, March 22, 2013

Paper Flowers Video


Happy Friday all.  Yup, it's Friday... YAY... and that means that it is time for another Friday Video Tutorial!  

Since i have been so obsessed with the Pop Up Posies Designer Kit i thought that i would do a video on how i make these awesome paper flowers! Have I mentioned how much i LOVE paper flowers and how wonderful this kit is?  It doesn't matter if you have never made a paper flower or if you have been making them for years, all your flowers are going to come out fabulous!!!

Let's take a look:


Told you they were awesome, lol:)


To get the tighter look of your paper flowers, i like to use a bit of water on each layer, then "scrunching" each layer into a small ball.  I personally just think that it gives it a little bit more!!!


For these kind of flowers, i don't wet them with water.  I just place each layer on the brad and then scrunch each layer again and then slowly separating them until i get the desired look that i want.

Well all, i hoped you enjoyed today's tutorial.  Until next time...
Signature Fonts
Image by FontMeme

Thursday, March 21, 2013

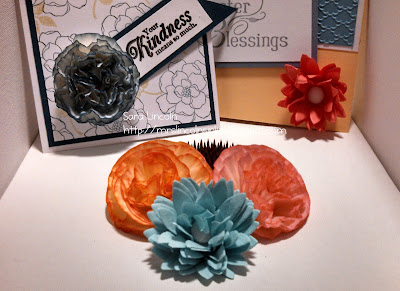
Posie Kindness


Hello!!! Welcome to Mrs. Lincoln's Inkin'! I am so glad that you stopped by today!!!!

So, as we know from my post yesterday i have been obsessed with the new Pop Up Posies Designer Kit since i received it a few days ago. Therefore, i thought that i would show you another card that i made using that same kit!! Obsessed i tell you... obsessed!!!

Today's card is a card i made using the Secret Garden stamp set, another of my favs!!  And can you tell what i did?  Yup, using my all time favorite technique, i made my own DSP with one of the images form the set!  I took my piece of Whisper White Card Stock, cut at 5" x 3 3/4" and stamped all over my paper with my image and Midnight Muse Ink.  You can't really tell from the picture but but before placing the images down, i would stamp some of my ink off so that it would be a "lighter" image rather than a very dark color image.  I thought that my background needed a bit more so i used the leaf stamp from Bloomin' Marvelous which is available right now through SAB! Hurry, Hurry though... SAB is only on until tomorrow!!! YIKES!! Don't miss out!!  Click here to see the whole SAB Brochure!!


For the flower today i used the second kind that comes with your Pop Up Posies Kit.  When you look at them when you first open your kit they look like mini cup cake holders, SO CUTE.  But with a little ink and a brad and my own little trick that i learned, which hint, hint i think might be the vocal point of tomorrow's video, lol, you can end up with something like this!


Well, i hope you all enjoyed today's share and don't forget to check out the SAB Brochure to catch the deals before they are gone.  Until next time...
Signature Fonts
Image by FontMeme

Supply List:

Stamps:
*Secret Garden
*Bloomin' Marvelous
*From My Heart

Inks:
*Midnight Muse
*Old Olive
*Versa Mark

Card Stock:
*Whisper White
*Midnight Muse

Tools:
*Pop Up Posies Designer Kit
*Sponges
*Piercing Matt
*Piercing Tool
*Heat Tool
*EK Success Embossing Powder Tool
*Black Embossing Powder
*Snail
*Dimensionals
*Paper Trimmer
*Tumbo Glue

Wednesday, March 20, 2013

Easter Blessings


Hello Stampers!!!

Easter is right around the corner so i wanted to share another card with you today using 2 new products that i just received in my last shipment of goodies! I love new goodies!!! 

My first new goodie was the Easter Blessing stamp.  I purchased this recently after realizing that i only had one Easter set:( How on Earth did that happen! This new greeting I think is so elegant and pretty!!! I love the look of it!  I placed my greeting on a piece of Whisper White card stock that measures 4" x 2 1/4".  I matted that with a piece of Wisteria Wonder which measures at 4 1/4" x 2 1/2". 

On the top of my card i wanted my design to be simple... clean cut but "eastery" (if that is even a word, lol).  I ran a piece of Marina Mist, cut at 5 1/4" x 2", through my Fancy Fan embossing folder with my Big Shot and matted that with another piece of Whisper White, measuring 5 1/2" x 2 1/4".  Lately i have been obsessed with matting my colored card stock with White... when normally it is the other way around!!

To finish off my card i used a posies from the new and totally awesome Pop Up Posies Designer Kit!! I LOVE THIS KIT!!  As you may know by now, i love making paper flowers! In this kit you get everything you need to make fabulous flowers! Never made a flower before using paper? No worries, this kit all you do is put the flowers together, punch a hole for your brad and puff them up... that's it!!  Here is a closer look at the kit:

Everything you need, right there!! Plus, you also get the "just for you" stamp which i used in Monday's post. Click here to view that post! 

Well, until next time friends...
Signature Fonts
Image by FontMeme

Supply List:

Stamps:
*Easter Blessings

Inks:
*Wisteria Wonder

Card Stock:
*So Saffron
*Whisper White
*Marina Mist
*Wisteria Wonder

Tools:
*Big Shot
*Fancy Fan Embossing Folder
*Piercing Matt
*Piercing Tool
*Pop Up Posies Designer Kit
*Jewels

Tuesday, March 19, 2013

Promotion Reminders

Good day all!!! Welcome!!!

For today's post i wanted to do a friendly reminder of all the SU! promotions that soon will be coming to an end:( As well as the promotions that are still available for awhile but are so awesome they deserve a little shout out!! 


The first reminder is for the Single Stamp Assortments that are only available until March 31, 2013! These single stamps are a great way to build or start your collection without having to buy a whole set if you are new to the craft!
Click here to see the assortment #3 flyer
and Click here to see assortment #4.


Sale-A-Bration is only going on until March 22, 2013 (that's this Friday, yikes!!).  Don't miss out on receiving  free product with every $50 you spend (before s/h and tax).  There is no limit to how much free product you can receive.  You spend $50, you get one product free... you spend $100 you get 2 items free!! It is totally up to you!!
Click here to view the entire SAB Brochure!


Now, the Spring Catalog isn't going away until May, but i still wanted to remind you of it because there is some AWESOME product in there that you are not going to want to miss!  Click here to view the entire catalog!!


Paper Pumpkin is a great way that you can have your creativity come to your door each month!! A Paper Pumpkin membership is $19.95 per month (and shipping is included!), with this you will get everything that you need to have some creative fun!!!  Here is a little bit more info directly from the SU! site:
  • Each month we send you a unique, surprise kit with a project-cards, journals, décor, and more! (We've even color-coordinated, measured, and cut everything for you!)
  • Each kit includes stamps, ink, paper, and accessories-everything but adhesive.
  • Each kit gives you a 30-minute creativity escape.
  • We will ship your Paper Pumpkin on or around the 15th of the month.  
  • You need to sign up for a kit by the 10th of the month to get that month's kit. If you sign up on the 11th of the month, your first kit will come the next month. (Let's say you sign up on May 10th, we'll send your kit around May 15th. If you sign up on May 11th, we'll send your first kit around June 15th.)
  • A Paper Pumpkin membership is $19.95 per month (and shipping is included!)   
  • There's no commitment, you can cancel your monthly Paper Pumpkin at anytime. You can also skip a month if you want.

  •  How fantastic is that?!?!?!?  Click here to sign up today!!

    Well everyone, there are a few of the amazing offers that are still available, some though not for much longer, through SU!!!  If you have any questions, please don't hesitate to contact me via email or leave a message/comment here on my blog.  Already know what you want?  Great, click here to place your order today!!  Until next time all...
    Signature Fonts
    Image by FontMeme

    Monday, March 18, 2013

    All Dressed Up For You


    Hi everyone, happy Monday!!! I hope you all enjoyed your weekend!!  Today's card is a simple card that i made using my new All Dressed Up Framelit Die set! Here is a closer look at the 3 dies you get when you purchase the set...


    Arent' they cute?!?  For my stamp image "all dressed up", that comes from the coordinating stamp set, All Dressed Up.  I only wanted my card to say "all dressed up" so i used my Basic Black Marker and only inked those 3 words.  Here is a closer look at that set:
    Now on  to a new promotion!  SU! is releasing a set straight out of the new annual catalog that will be released shortly!  It coordinates with the 7/8" Scallop Circle Punch that you can still get right now in the Spring Catalog! Click here to view the whole Spring Catalog! Take a look:)


    What an awesome deal!! Well all, hoped you enjoyed today's post! Until next time...
    Signature Fonts
    Image by FontMeme

    Supply List:

    Stamps:
    *Alhambra Wheel
    *Just for you
    *All Dressed Up

    Ink:
    *Pink Pirouette
    *Basic Black Marker
    *Basic Black

    Card Stock:
    *Polka Dot Parade
    *Pink Pirouette
    *Elegant Eggplant

    Tools:
    *Dress Up Framelits
    *Big Shot
    *Snail
    *Dimensionals
    *Scallop Trim Boarder
    *Pearls
    *Word Window Punch

    Friday, March 15, 2013

    Easter Bunny Box Video

    Happy Friday all.  Welcome to another Friday Video!!!  Today's tutorial is on this ADORABLE Easter Bunny Punch Out Box. Urg, i  just love how cute he is!! I love when you can make things where the gift (treat) itself is the homemade creation but you can also put other fabulous treats, like yummy candy, inside as well.


    Let's go ahead and take a look at this adorable little creature shall we?  Here we go....

    I hope that video wasn't too confusing!! I didn't really know the best way to demonstrate all the punches that you were going to need.  So, in case you missed it, here is what you will need:

    -4 Large Ovals (all the same color as the bunny body. 2 for the ears and 2 for the feet)
    -4 Small Ovals (1 3/4" x 7/8"). You need 2 of these in either a pink color or white... these are for the inside of his ears and then he other 2 need to be in the color of his body.  These are for the flaps of his ears.
    -2 of the 1 1/2" Circle Punch.  Remember, cut 1/4" to 1/2" of the circle off.  This is what you are going to use to make his puffy nose.
    -3 of the 1" Circle Punch.  Punch out 2 in black for his eye's and 1 in the color of his body and cut it in half.  This is going to be what you use for his eyelids.
    -2 of the 3/4" Circle Punch.  This is what you will use for the "balls" of his feet.
    -6 of the Itty Bitty Circle Punch.  These are for his toes.
    -1 Heart.  This is for his nose (how cute!!)
    -2 Top Note dies.

    To make your box remember your score marks on your 8 1/2" x 11" paper are at 4" and 7" with your paper going the "landscape" way on your score board.  Now flip 1/4" in, so that your paper is now going the "portrait" way and score at 2 3/4" and 5 3/4".  Now snip your score marks (the 5" and 7" lines) up to the crossing lines, fold up your flaps!!

    I hope you all enjoyed today's video!!! Until next time friends...
    Signature Fonts
    Image by FontMeme

    Supply List:

    Ink:
    *Crumb Cake
    *Basic Black Marker

    Card Stock:
    *Crumb Cake
    *Basic Black
    *Pink Pirouette

    Tools:
    *Top Note Die                                     *Large Oval Punch
    *Big Shot                                             *1 3/4" x 7/8" Oval Punch
    *Score Board                                       *3/4" Circle Punch
    *Bone Folder                                       *Itty Bitty Circle from the Itty Bitty Punch Set
    *Red Sticky                                          *Snail
    *Paper Snips                                        *1  1/2" Circle Punch
    *1" Circle Punch                                 *Sponges
    *Dimensionals                                      *White Gel Pen

    Thursday, March 14, 2013

    Easter Bunny Punch Art


    Hello there all, welcome!!  Today's card is another Easter card that i made using Punch Art!! I love Punch Art!!!  Isn't this bunny just adorable?!?!?!?  I wanted to make my card look a little... child-like, so i opted for a very simple card using the bunny and then just the base of my card, Tempting Turquoise (average size 4 1/4" x 11" scored at 5 1/2") and then and some Wild Wasabi for my grass.  I cut this piece at 5 1/2" x 1 1/4" and then took my paper snips and made little "cuts" wherever i wanted my blades of grass to be!  Then i added my finishing touch, my sun.  I used two circle punches for this, my 1 3/4" and 1 1/4" Circle, and then free handed some strips for my rays.  Puffed the two circles with a Dimensional to give it some character and that is it.

    For my bunny i used many different punches!  Here is a closer look at him:


    Here is a list of what punches i used for him:
    -Body (butt): 2 1/2" Circle Punch
    -Head: 1 3/4" Circle Punch
    -Back part of ears: Large Oval Punch
    -Inside of ears: 1 3/4" x 7/8" Oval Punch
    -Cheeks (white circles): 1" Circle Punch
    -Eyes, nose and tail: Build an Owl Punch
    -Feet: 1" circle Punch, cut in half

    And that is how i assembled my bunny! It takes a few punches but really only a second to make after you get everything all punched out the way that you want.  I hope you all enjoyed today's card.  Until next time...
    Signature Fonts
    Image by FontMeme

    Supply List:

    Stamps:
    *Everybunny

    Inks:
    *Basic Black

    Card Stock:
    *Soft Suede
    *Pink Pirouette
    *Whisper White
    *Basic Black
    *Tempting Turquoise
    *Wild Wasabi
    *So Saffron

    Tools:
    *1 3/4" x 7/8" Oval Punch
    *Large Oval Punch
    *Build an Owl Punch
    *2 1/2" Circle Punch
    *1" Circle Punch
    *1 3/4" Circle Punch
    *1 1/4" Circle Punch
    *Elegant Label Punch
    *Paper Snips
    *Paper Trimmer
    *Snail
    *Tumbo Glue

    Tuesday, March 12, 2013

    Easter Oval


    Hello there!!  Today's card is a fun and vibrant Easter card using a few different DSP's and a fun little Easter image from the set Everybunny!  Have i mentioned lately how much i love this set?  It is an older set but you know what they say... an oldy but goodie!!!

    For my background i wanted the card to be "fun" so i decided to go with 3 different patterns of DSP.  One thing i love about doing cards like this is that your DSP doesn't always have to perfectly match...you can play around with fun different designs, patterns and colors and somehow, don't ask me how, but it always seems to work.  At least i think that it does!!

    I used a petite paper pack from Lawn Fawn for my DSP (pack measures 6"x6").  I cut my bottom and top pieces approximately 4 1/4" x 3" and placed them on the top and bottom of my card.  Then, i took a piece that i used for the middle, cut at approximately 4 1/4" x 2".  To add a bit of something to my middle piece of DSP i took a piece of scrap Purple Ribbon and tied it into a side bow, then cut my image out on a piece of Whisper White using my Creative Memories Oval cutters.  For those of you that are familiar with CM, i used my Green cutter with my medium Oval for my Whisper White and then my Red Cutter for the same Oval for my Elegant Eggplant which i used to "frame" my image!  Here is a closer look at this adorable stamp set that i used today:
    I stamped my image in my Memento Black ink so i could use my Copic markers to color it. I find that with Memento ink, when coloring with Copics, the outline ink doesn't smear or "run".  I have tried it with other inks such as StazOn and regular black ink and have found that ink runs when the Copic Ink touches it, so that is why i recommend Memento Ink (lol just an F.Y.I.)

    A quick reminder before i head out for the day, don't forget that Sale-A-Bration is only on until the 22nd of this month, that means that there is just a little over a week where you can still earn free goodies with every $50 you spend (before tax and s/h).  Click here to check out the complete brochure of SAB!!!
    
    I hope you all enjoyed today's easy/crazy colored card today!! I hope to see you again! Until next time...
    Signature Fonts
    Image by FontMeme

    Supply List:

    Stamps:
    *Everybunny

    Inks:
    *Black Memento Ink
    *Copic: Yg03, E57, E31, B21, RV21

    Card Stock:
    *Whisper White
    *Lawn Fawn Petite Paper Pack
    *Elegant Eggplant

    Tools:
    *1 3/4" x 7/8" Oval Punch
    *Scallop Oval
    *Purple Ribbon
    *Paper Trimmer
    *Creative Memories Cutting System (ovals)
    *Snail
    *Dimensionals